
Hairline cracks in plaster walls are the single most common interior wall problem we get asked about in older Connecticut and New York homes. Pre-1950s plaster-and-lath construction is everywhere across Fairfield County, Westchester, Putnam, and Dutchess, and a hairline crack in plaster is almost always fixable as a one-afternoon DIY job. The trick is reading the crack before you reach for filler, picking a compound that actually bonds to plaster (not all of them do), and addressing why the crack appeared so you do not patch the same spot twice in three years.
This guide covers what causes hairline cracks in plaster walls, how to tell plaster from drywall and plasterboard (the right repair material depends on which one you have), how to read the crack pattern to decide cosmetic versus structural, the step-by-step repair with the correct materials, and the patterns that mean stop and call a foundation pro before you spend money on tape and mud.
What hairline cracks in plaster walls actually are
A hairline crack in plaster is a thin, surface-level split running through the plaster finish layer, usually thinner than the edge of a business card. Most are caused by normal building movement (seasonal humidity, framing shrinkage, minor settlement) interacting with plaster's natural rigidity. Plaster is harder and less flexible than drywall, so when the framing behind it flexes even slightly, the plaster surface cracks rather than bowing.
Almost every plaster wall in a home over 50 years old has at least a few hairline cracks. They are not a sign of structural failure on their own. They are a sign that the wall is reacting to the building moving around it, which every building does.
What causes hairline cracks in plaster walls
Plaster cracks for predictable reasons. Once you can name the cause, you can pick the right repair material and decide whether the crack will come back.
Plaster shrinkage during the original cure
Fresh plaster shrinks as it dries and continues drying for months after the surface feels cured. Hairline cracks in new plaster almost always trace to this. They are cosmetic and stop appearing once the wall has been through one full heating season.
Seasonal humidity swings
Plaster absorbs and releases moisture with the air around it. Indoor humidity in CT and NY homes can swing from 60 percent in summer to under 20 percent in winter. Plaster expands and contracts with that swing and the surface cracks at the points of greatest stress, typically above doors and windows where the wall is structurally weakest.
Building settlement
New homes settle for the first 2 to 3 years after construction. Hairline cracks above door and window headers appearing in a recently built home are usually settlement, not structural failure. The cracks typically stop growing after the building stabilizes.
Wood lath movement in older homes
Pre-1950s plaster sits on wood lath strips nailed to the framing. The lath swells in humid summer air and shrinks in dry winter air. The plaster bonded to it (through plaster keys that wrap around the back of the lath) flexes with that movement and cracks. Hairline crack patterns running parallel to the lath strips are the giveaway.
Framing shrinkage
New construction lumber dries for 2 heating seasons after installation. As studs lose moisture, they shrink slightly and the plaster bonded to drywall (or directly to the studs in skim-coat plaster) cracks. Cracks at corners and at the top of long walls are typical.
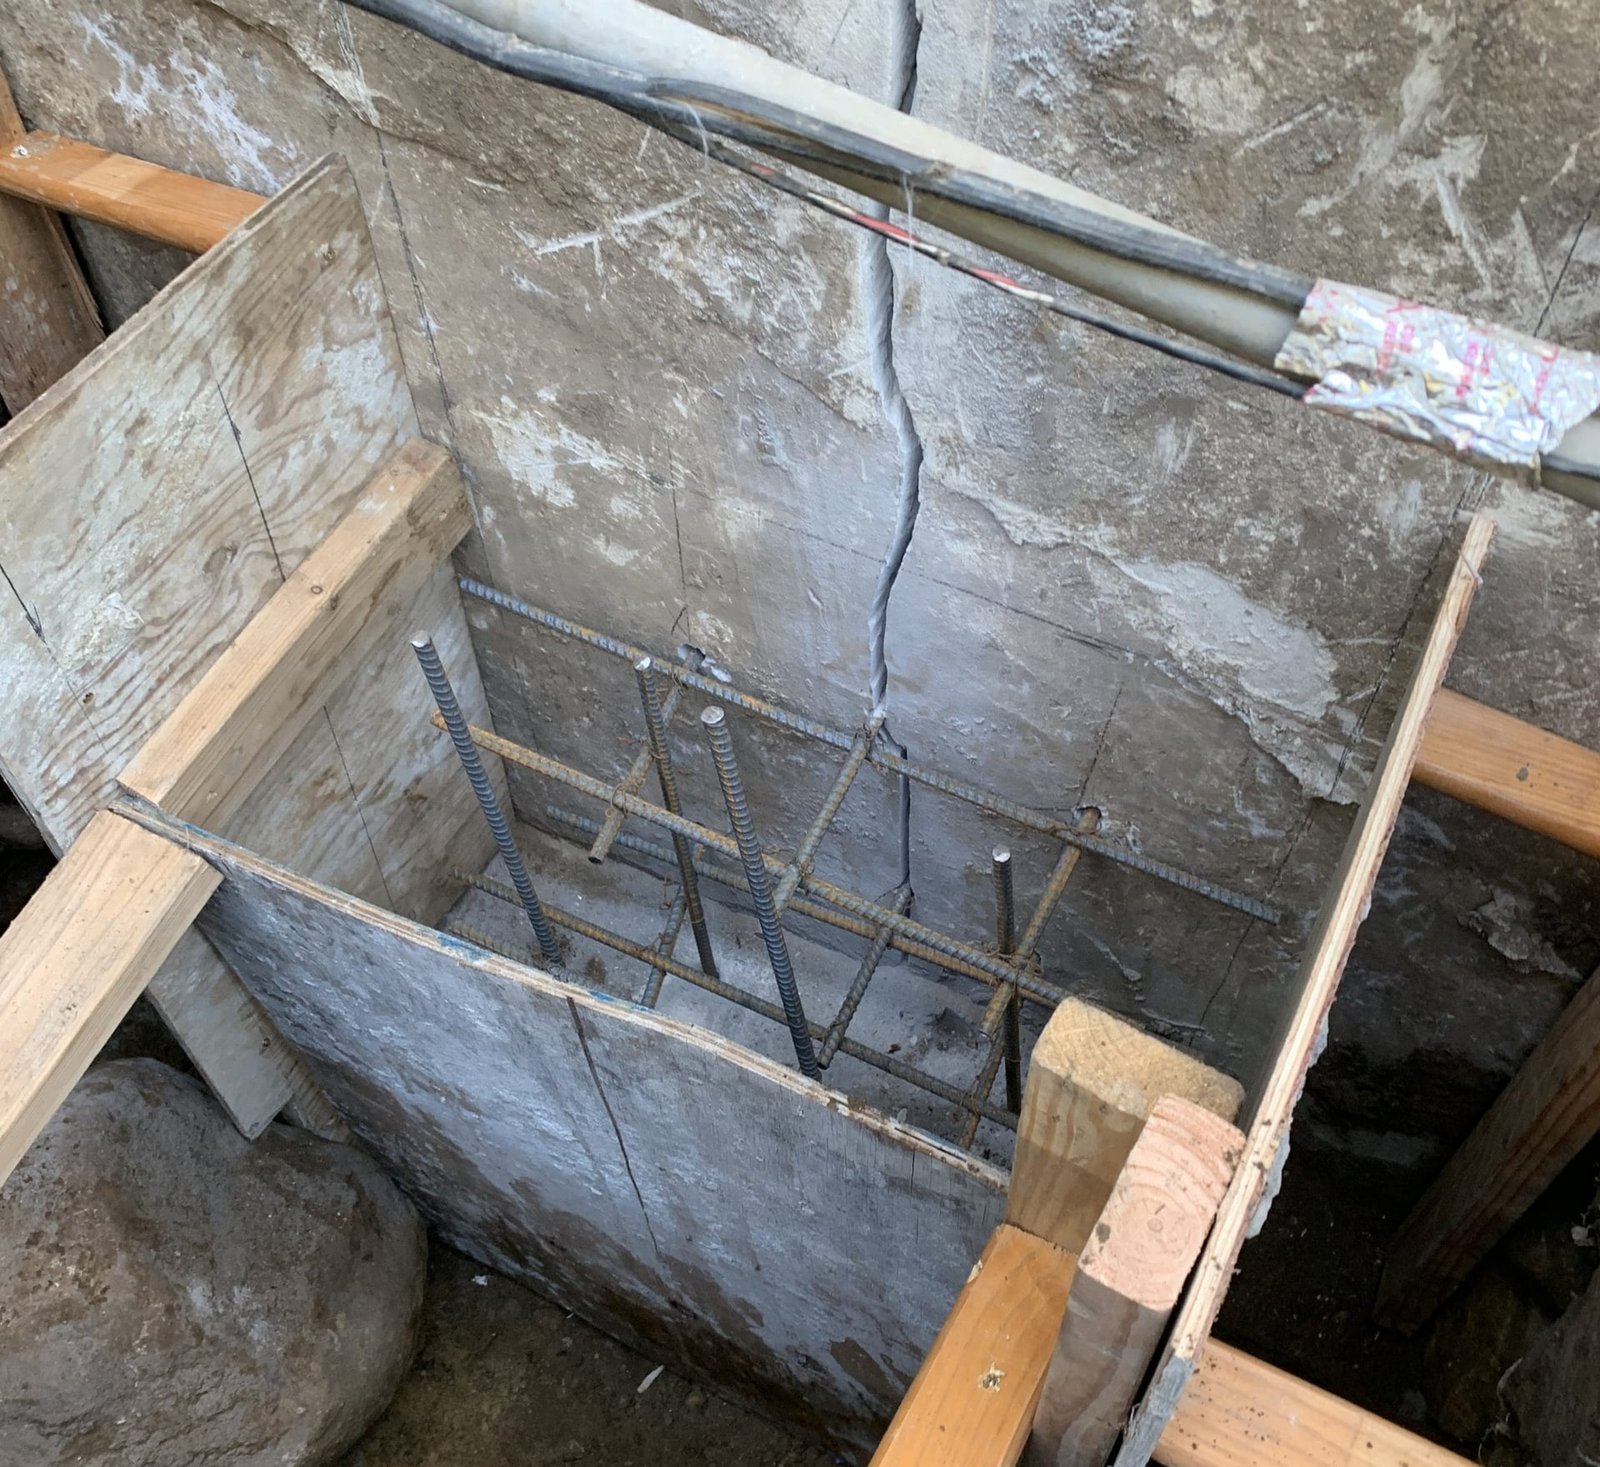
Underlying structural movement (the red-flag cause)
A small percentage of hairline cracks in plaster are not surface problems at all. They are foundation movement telegraphing through the wall. Recurring cracks in the same spot, horizontal cracks low on a wall, stair-step patterns through corners, or cracks that widen over time all point to something deeper than plaster shrinkage. See the section below on reading the pattern before any filler goes in.
Plaster vs drywall vs plasterboard — which do you actually have?
These three terms get used interchangeably and the right repair material is not the same for each. A two-minute identification check before you buy materials saves a wasted trip to the hardware store.
Quick identification test
Tap the wall with your knuckle. Plaster sounds dense and solid, almost like tapping a kitchen counter. Drywall sounds hollow and cardboard-like. Drive a thumbtack into the wall in a discreet spot. If it goes in with light finger pressure, drywall. If you have to push hard or it bends, plaster.
Plaster (most homes pre-1950s)
Hard, dense, often 3/4 to 1 inch thick, applied wet over wood lath strips. Common in CT and NY homes built before WWII. Cracks need flexible setting-type compound or a true plaster patch like Plaster Magic — premixed drywall mud shrinks differently and telegraphs the crack back through paint within a season.
Drywall / sheetrock (most homes post-1950s)
Paper-faced gypsum board screwed to studs, typically 1/2 inch thick. Hairline cracks in drywall are usually at seams (where joint compound has dried and split) or above doors and windows. Standard setting-type joint compound and fiberglass mesh tape work perfectly.
Plasterboard (UK terminology, same as drywall)
Plasterboard is the British and Australian name for the same gypsum sheet product Americans call drywall or sheetrock. If you searched for cracks in plasterboard walls, your repair approach is the drywall approach above — fiberglass mesh tape and setting compound, three feather coats, prime, paint.
Cosmetic vs structural: read the pattern before you fix
Most hairline cracks in plaster walls are cosmetic and safe to repair as a DIY job. A small percentage are structural and will reappear no matter how carefully you sand, prime, and paint. Three quick checks separate them.
The credit card test (width)
Hold the long edge of a credit card against the crack. Thinner than the card edge is hairline and almost always cosmetic. Wider than the card is no longer hairline — that is a structural-grade crack that needs different treatment.
The direction test
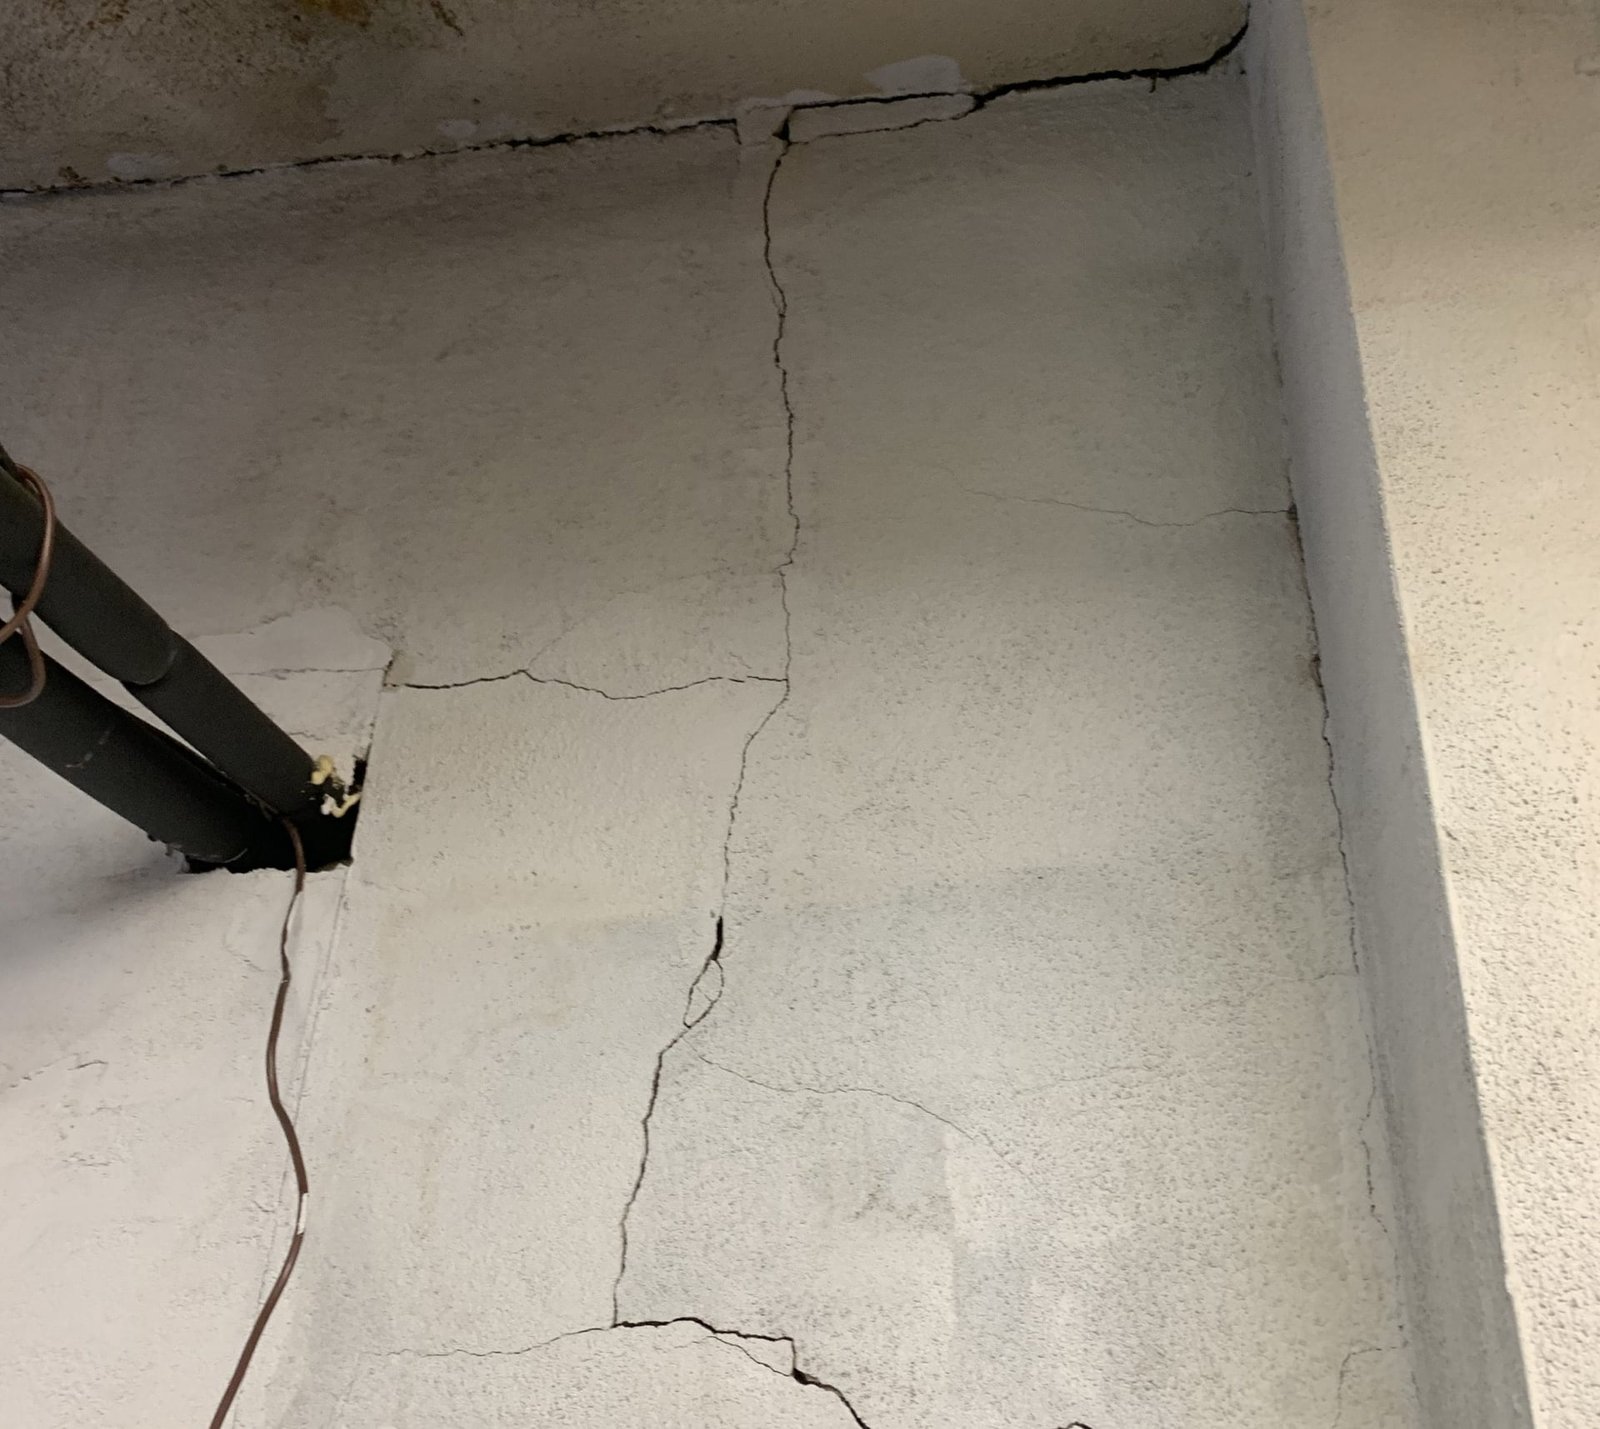
Vertical hairlines above doors and windows are usually framing-related and cosmetic. Diagonal cracks running from corners are often settlement and frequently still cosmetic. Horizontal hairline cracks across the middle of a wall, especially low on the wall, are the structural red flag — they signal lateral pressure from outside the wall. Stair-step cracks following the brick or block mortar joints behind plaster (visible in plaster-on-block construction) almost always mean foundation movement.
The history test
Photograph the crack with a coin or business card in frame for scale, date the photo, and mark each end of the crack with a pencil tick. Check again in 30 to 60 days. If the crack has grown past your pencil marks, water has come through, or the wall has shifted, the crack is alive and needs structural assessment before any cosmetic repair will hold. If nothing has changed, it is static and safe to fill.
The five hairline crack patterns you will actually see in plaster walls
Vertical hairline cracks above doors and windows
Thin straight cracks running diagonally from the top corner of a door or window frame. The header above the opening is the weakest point in any framed wall, and plaster (or drywall) over it flexes slightly with seasonal humidity and any minor settlement. These are cosmetic in roughly 90 percent of cases. Mesh tape + setting compound fixes them permanently in most homes.
Horizontal hairline cracks
Hairline cracks running horizontally across the wall, especially low on the wall, are the pattern to watch most carefully. Sometimes they are simply lath movement in older homes (typically higher up on the wall, in the middle third). But a horizontal crack within 12 inches of the floor is often telegraphing lateral pressure on the wall behind it — particularly if the wall backs onto a basement or is below grade. If you see this pattern, especially in a plaster-on-block exterior wall, take it seriously before reaching for filler.
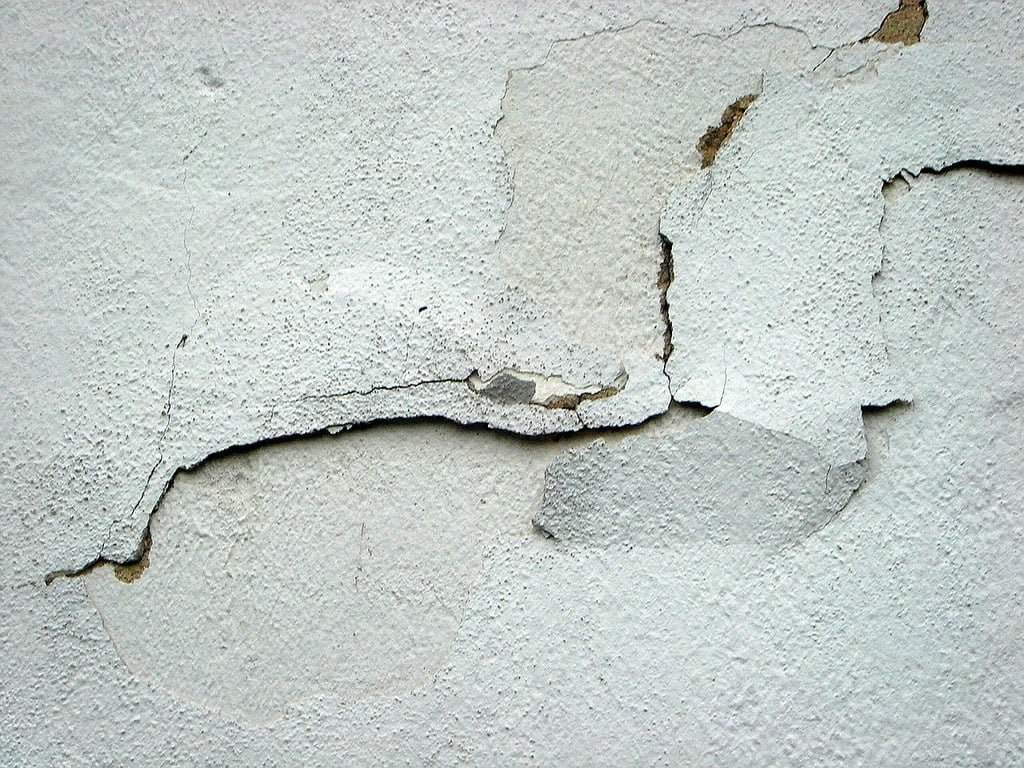
Spider cracks (also called map cracks or alligator cracks)
A web of fine cracks across the plaster surface, like cracked porcelain or a dried lakebed. Caused by overworked plaster during the original finish coat, an over-thick paint film, or thermal expansion across the surface. Always cosmetic. The standard repair is a skim coat across the affected area rather than mesh-tape-and-fill of every line.
Hairline cracks in new plaster
Cracks appearing in plaster within the first 6 to 12 months after installation. These are shrinkage cracks from the plaster curing and the building's first heating season. Almost always cosmetic. Wait until the first full year is past before patching — otherwise you will be filling the same cracks again next winter.
Recurring cracks in the same spot
Cracks that come back after a careful repair are the single most reliable indicator of structural movement behind the wall. Re-skimming a recurring crack without addressing the cause is decorative work — the underlying motion will keep reopening it. See the foundation-pro callout at the end of this guide.
What you will need to fix hairline cracks in plaster walls
The right materials matter more for plaster than they do for drywall. Plaster has its own thermal and humidity behavior, and a filler that works on drywall can shrink at a different rate from the surrounding plaster and reopen the crack within months.
Tools
- 5-in-1 painter's tool or stiff putty knife for V-cutting the crack open
- 6-inch taping knife (or 8-inch for wider feathering)
- Shop vacuum with brush attachment for dust removal
- Stiff bristle brush for cleaning inside the crack
- 220-grit sanding sponge or sanding block (drywall sanding pole helps for ceilings)
- Damp microfiber cloths for dust pickup between coats
- Drop cloth or rosin paper to protect the floor
Materials, in order of importance
- Fiberglass mesh tape (self-adhesive) — resists movement better than paper tape on a plaster repair
- Setting-type joint compound (USG Sheetrock 45 for general use, Sheetrock 90 if you want longer working time) — sets chemically and shrinks far less than premixed all-purpose mud
- Or for true historic plaster repair: Plaster Magic or a hot-mud lime-based plaster patch — bonds to original plaster keys without telegraphing through paint
- TSP (trisodium phosphate) or TSP substitute, mixed per label for cleaning inside the crack
- Zinsser BIN or Kilz Original stain-blocking primer for sealing the patched area before paint
- Matching wall paint (full can — you will be repainting the whole wall, not just the patch)
Skip these even though hardware-store displays push them: premixed lightweight spackle (shrinks and falls out of hairline cracks within a year), DryLok or masonry crack filler (designed for cement, not plaster), and paintable caulk on flat wall cracks (looks fine for a month then telegraphs through). The savings on cheaper materials are real but the redo in 12 months costs more than doing it right the first time.
Step-by-step: how to fix hairline cracks on a plaster wall
Read the diagnostic section above first and confirm your crack is cosmetic (thinner than a credit card, not growing, no horizontal or stair-step pattern). Then follow these steps. Total working time is about 2 hours plus drying time between coats.
1. Widen the crack and clean it out
Use the corner of a 5-in-1 tool or a stiff putty knife to V-cut the crack open to about 1/8 inch wide. This gives the filler something to bond into instead of sitting on the surface. Vacuum the dust out, then dip a stiff bristle brush in TSP-and-water and clean the inside of the crack so the compound bonds to clean plaster, not loose dust.
2. Cut your mesh tape ahead of time
Pre-cut self-adhesive fiberglass mesh tape into segments matching the crack length. Cutting first prevents creases and folds during application. Stack the segments in order so you can grab them quickly while the compound is still wet.
3. Apply the bed coat of setting compound
Mix setting-type compound (Sheetrock 45 or 90) per the label. For true plaster walls, use Plaster Magic instead — it bonds to original plaster keys without shrinking differently. Apply a thin bed coat slightly wider than the tape, working the compound into the V-cut crack.
4. Embed the mesh tape
Press a pre-cut mesh segment over the wet compound and smooth it flat with a 6-inch taping knife. Work out wrinkles and air pockets. Let the compound set per its working time (45 or 90 minutes for the named products).
5. Skim coat number two, feathered wider
Apply a second skim coat over the tape, feathering the outer edges 3 to 4 inches past the tape. Let it set fully before sanding.
6. Skim coat number three, feathered wider still
Apply a third feather coat, 6 to 8 inches past the second. Three thin coats blend better than one thick coat and resist hairline reopening far longer.
7. Sand smooth with 220-grit
Sand each cured coat smooth with 220-grit on a sanding block. The goal is flat with the surrounding wall, not below it. Wipe dust with a damp microfiber, not a dry brush (dust will stop primer from bonding properly).
8. Prime with a stain-blocking primer
Spot-prime the patched area with Zinsser BIN or Kilz Original. Feather the primer at least 6 inches past the repair so the texture transition is gradual. Painting straight over unprimed compound creates a visible flat spot through the topcoat — every time.
9. Repaint the entire wall, corner to corner
Spot repainting almost always leaves a visible halo, even with the same paint can from the same store from the same year. Roll the entire wall corner to corner with the same nap roller as the original finish. Two coats beat one for hiding the underlying patch.
Hairline cracks in plaster ceiling — extra considerations
Ceiling plaster cracks are repaired the same way as wall cracks, but two factors change the work. Gravity pulls cured compound away from the ceiling and overhead work is harder on your neck. Plus, ceiling hairline cracks more often hide active problems: water damage from a slow leak above, sagging plaster from broken keys behind the lath, or framing shrinkage in the ceiling joists. Press lightly on the plaster around the crack — if it gives at all, the keys behind the lath have broken and you need plaster washers to refasten the field before patching the crack itself. Recurring ceiling cracks above a bathroom or kitchen often trace to a plumbing pinhole leak nobody has found yet.
How to prevent hairline cracks from coming back
Most recurring hairline cracks have one of four causes, and three of them are fixable without a structural contractor.
- Keep indoor humidity between 30 and 50 percent year round (use a whole-house humidifier in winter and run AC or a dehumidifier in summer) — this is the single biggest win for plaster
- Use setting-type compound on every repair, not premixed all-purpose mud (premixed shrinks more and is the most common reason a repaired crack reopens)
- Re-tape with fiberglass mesh on any repair where the original paper tape has lifted
- Address active foundation or framing movement before it telegraphs again — paint cannot solve a building-moving problem
Frequently asked questions about hairline cracks in plaster walls
Are hairline cracks in plaster walls serious?
In most cases no. Static, thin (less than a credit card edge), non-growing hairlines in older plaster are cosmetic. They become serious when they grow, when they appear horizontally across the middle of a wall, when they recur after careful repair, or when multiple cracks appear at the same time on different walls. Those patterns point to structural movement, not plaster shrinkage.
What is the best way to fill hairline cracks in plaster?
Setting-type joint compound (USG Sheetrock 45 or 90) with fiberglass mesh tape for general plaster, or Plaster Magic for true historic plaster-on-lath. Both bond to original plaster better than premixed all-purpose drywall mud, which shrinks at a different rate and reopens the crack within a season. Three thin feather coats beat one thick coat every time.
Can I just paint over hairline cracks?
Almost never permanently. Latex paint stretches roughly 10 to 15 percent before tearing. Most hairline cracks open more than that across a single seasonal humidity cycle. The crack tears the paint film along its original path and reappears, often wider than before because the surface around it has flexed too. Painting over also hides a useful diagnostic signal — a repeating crack is telling you something behind the wall is moving and the paint hides the evidence.
What causes hairline cracks in plaster walls?
Five common causes in order of frequency: plaster shrinkage during cure, seasonal humidity swings, building settlement (especially in homes under 3 years old), wood lath movement in pre-1950s plaster, and framing shrinkage in new construction. A small percentage are caused by underlying foundation or structural movement, which is the pattern to watch out for.
How do you fix hairline cracks in plasterboard or drywall?
Same eight-step process as plaster, with one swap: skip Plaster Magic and use setting-type joint compound throughout. Plasterboard (the British term) and drywall (the American term) are the same gypsum-sheet product and respond the same way to fiberglass mesh tape and Sheetrock 45 setting compound.
Should I use caulk or joint compound for hairline cracks?
Joint compound for flat-wall hairline cracks, every time. Paintable caulk is designed for joints that move (corner joints between a wall and ceiling, trim-to-wall joints, around windows) and will pull away from a flat wall surface within a few seasons. Caulk on a hairline crack also resists sanding — you cannot flatten it to invisible the way you can a compound feather coat.
What's the difference between hairline cracks in new plaster vs old plaster?
New plaster cracks (first 6 to 12 months) are almost always shrinkage from the curing process and the first heating season. They are cosmetic and stop appearing once the first full year is past. Cracks in old plaster (homes 50+ years old) are usually lath movement or humidity-related and are also typically cosmetic. The difference matters for timing — wait the first year out on new plaster before patching, otherwise you will be patching again next winter.
How do you stop hairline cracks from coming back?
Three habits eliminate most recurring hairlines. Keep indoor humidity between 30 and 50 percent year round. Use setting-type compound, not premixed all-purpose mud. Re-tape with fiberglass mesh on any repair where the original paper tape has lifted. The fourth fix, when the cause is foundation or structural movement, is to address the building movement itself — paint and tape cannot solve that.
How long does the repair take?
Active working time is about 2 hours plus drying time between coats. With setting-type compound on the 45-minute working time, you can apply all three skim coats in a single afternoon. Primer and paint can wait until the next day, or longer if your humidity is high.
When to call a foundation pro instead
Six patterns mean the crack is not really a plaster problem and surface repair will fail. If any of these apply to your wall, get it inspected before spending money on tape and mud.
- The same hairline crack has been repaired before and keeps coming back
- The crack is horizontal, especially within 12 inches of the floor
- The crack runs in a stair-step pattern through a brick or block wall behind the plaster
- Multiple hairline cracks have appeared across different walls in the same season
- Doors and windows in the same room have started sticking, or floors have started to slope
- Any crack is wider at one end than the other (settlement signature)
All six patterns point to building movement behind the wall, not surface plaster behavior. The right scope is structural inspection first, address the underlying cause through foundation crack repair or wall crack repair depending on what we find, then the cosmetic finish. Foundation inspections across Fairfield County, CT, Westchester County, NY, Putnam County, NY, and Dutchess County, NY are free with a written quote on the spot.
Raf Volkov
Raf has personally inspected and supervised more than 1,300 foundation repairs across Fairfield County, CT and Westchester County, NY since 2002. He attends World of Concrete and manufacturer trainings every year, currently holds 60+ active industry certifications, and works with a scientific background spanning microbiology, toxicology, and structural engineering — applied to every wall, slab, and footing we touch.
Got a crack that needs a real diagnosis?
We service Fairfield County CT and Westchester County NY. Free on-site inspection, honest root-cause diagnosis, written quote, no obligation.