
Painting over a wall crack covers it for one season. Sometimes two. After that the crack telegraphs back through the paint, usually wider than before, because paint cannot stop the movement that opened the crack in the first place. Across our inspections in Fairfield County and Westchester County, painted-over cracks are the second most common cause of repeat customer calls behind failed contractor injection work.
The right approach is the opposite of what most homeowners do. Diagnose first, fix the cause if there is one, repair the crack with a material that matches its behavior, then paint. This guide walks through how to read a wall crack, which cracks are safe to repair yourself, and which patterns mean call a professional before the paint goes on.
Why painting over wall cracks fails
Latex paint stretches roughly 10 to 15 percent before tearing. Most wall cracks move more than that over a single seasonal cycle, expanding in summer humidity, contracting in winter dry air. By spring the paint film has split along the crack line, usually wider than the original crack because the surface around it has flexed too.
The bigger problem is what the paint hides. A repeating crack is a diagnostic signal. It tells you something behind the wall is moving (settling foundation, drying framing, leaking pipe, missing structural support), and covering it removes the most useful piece of evidence you had. Two or three coats later, the underlying cause has progressed, and the eventual repair is more expensive than it would have been if someone had read the crack the first time.
Cosmetic versus structural, before you reach for filler
Most wall cracks fall cleanly into one of two buckets. Cosmetic cracks are caused by surface materials (drywall, plaster, joint compound) reacting to humidity, framing shrinkage, or normal building settlement. They are hairline-thin, do not grow, and do not change shape across seasons. Structural cracks are caused by movement of the building itself (foundation settlement, bowing walls, framing failure, water damage). They widen, lengthen, or shift, and they reappear after every cosmetic repair.
Three quick checks separate them. Width: hold a credit card against the crack. Thinner than the card is cosmetic in 90 percent of cases. Thicker is suspect. Direction: vertical and tight hairlines above doors and windows are usually framing-related and cosmetic. Diagonal or stair-step patterns extending from a corner or floor joist are usually structural. History: photograph the crack with the date in frame, then check again in 30 days. Growth is the giveaway. A static crack is almost always safe to repair yourself.
The four wall crack types you will actually see
Hairline drywall cracks above doors and windows
Thin straight cracks running diagonally from the top corner of a door or window frame. Cause: the door header or window header is one of the weakest points in any framed wall, and the drywall behind it flexes slightly with seasonal humidity. Almost always cosmetic. Tape and skim coat fixes them permanently in most homes.
Drywall seam cracks (long straight lines on flat walls)
Long straight cracks running floor-to-ceiling or wall-to-wall, often along the edge of a drywall sheet where the joint compound has dried and cracked. Cause: original taping was thin, the room was painted before the mud fully cured, or the building has gone through a winter with low indoor humidity. Cosmetic. Re-tape with fiberglass mesh and reapply joint compound.
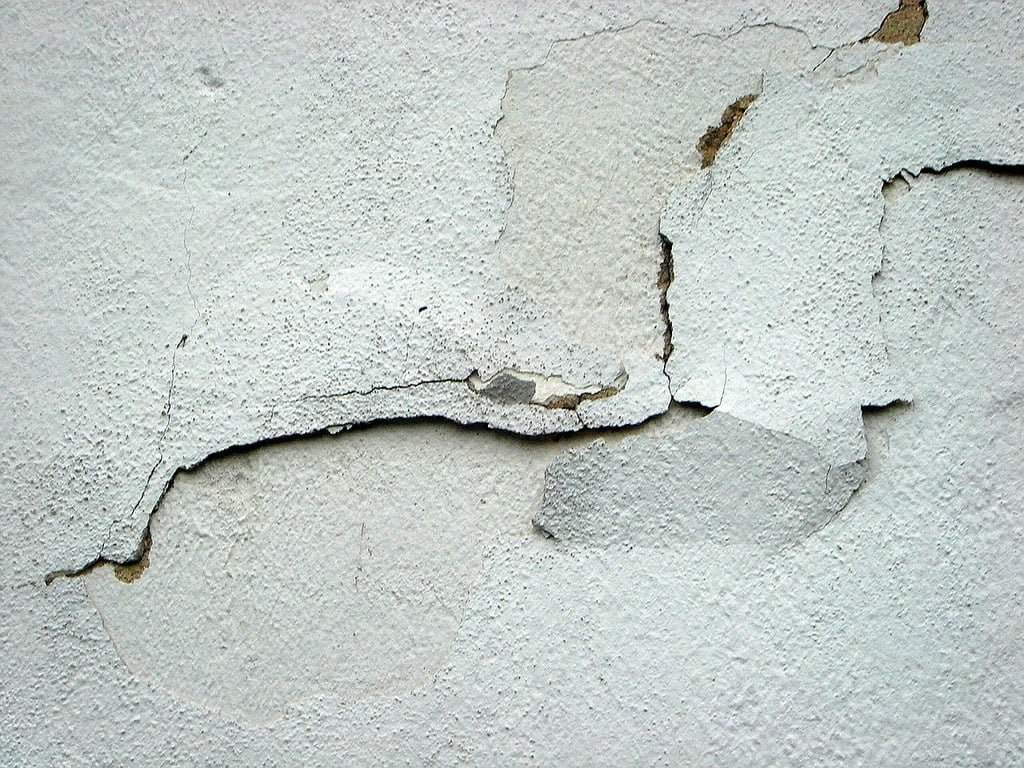
Plaster cracks in older homes
Spider-web cracks or wider single-line cracks in plaster-on-lath walls (common in CT and NY homes built before 1950). Cause: the lath has dried and shrunk, the plaster keys behind the lath have broken, or the wall has flexed slightly with seasonal humidity. Usually cosmetic, occasionally structural. Repair depends on whether the plaster is still bonded to the lath, which a screwdriver tap test reveals (loose plaster sounds hollow).
Stair-step cracks in masonry or block walls
Diagonal cracks that step along the mortar joints of brick or block walls, sometimes interior, more often on exterior facades and basement walls. These are almost never cosmetic. The wall is moving, and the mortar joints are the weakest path for the crack to follow. Cover at your own risk. We get more re-repair calls on painted-over stair-step cracks than any other category.
How to actually fix a cosmetic wall crack
For drywall and plaster cracks that pass the cosmetic field test (thinner than a credit card, not growing, not stair-stepping), the repair takes about an hour plus drying time. Materials we recommend (and use ourselves on cosmetic interior touch-up): fiberglass mesh joint tape, USG Sheetrock 45 setting-type joint compound, 220-grit sanding sponge, and a six-inch taping knife. Avoid the spackle-only approach, it sinks into the crack and pulls away within months.
Step by step
- 1Score the crack open. Use the corner of a utility knife to cut a shallow V along the crack, about 1/8 inch deep. This gives the joint compound something to bond into, instead of just sitting on the surface.
- 2Vacuum the dust. Compound will not bond to drywall dust, so this matters more than it sounds.
- 3Apply fiberglass mesh tape across the crack. Mesh tape is self-adhesive and resists movement better than paper tape on a repair.
- 4Skim with setting-type compound. Setting compound (Sheetrock 45 or 90) hardens chemically and is far more crack-resistant than premixed all-purpose mud. Two thin coats, sanded between, beats one thick coat every time.
- 5Sand smooth with 220 grit. Wipe with a damp sponge to remove sanding dust, then prime with a stain-blocking primer before paint.
For plaster walls, swap the joint compound for a true plaster patch (Plaster Magic or hot-mud lime-based compound). Modern joint compounds shrink at different rates than original plaster and tend to telegraph back through the paint. The right material matters.
When to stop sanding and call a professional
Six patterns mean the crack is structural and needs diagnosis before any cosmetic repair will hold. If you see any of these, schedule a free inspection before you spend money on tape and mud.
- Stair-step cracks following mortar joints in a brick or block wall, interior or exterior
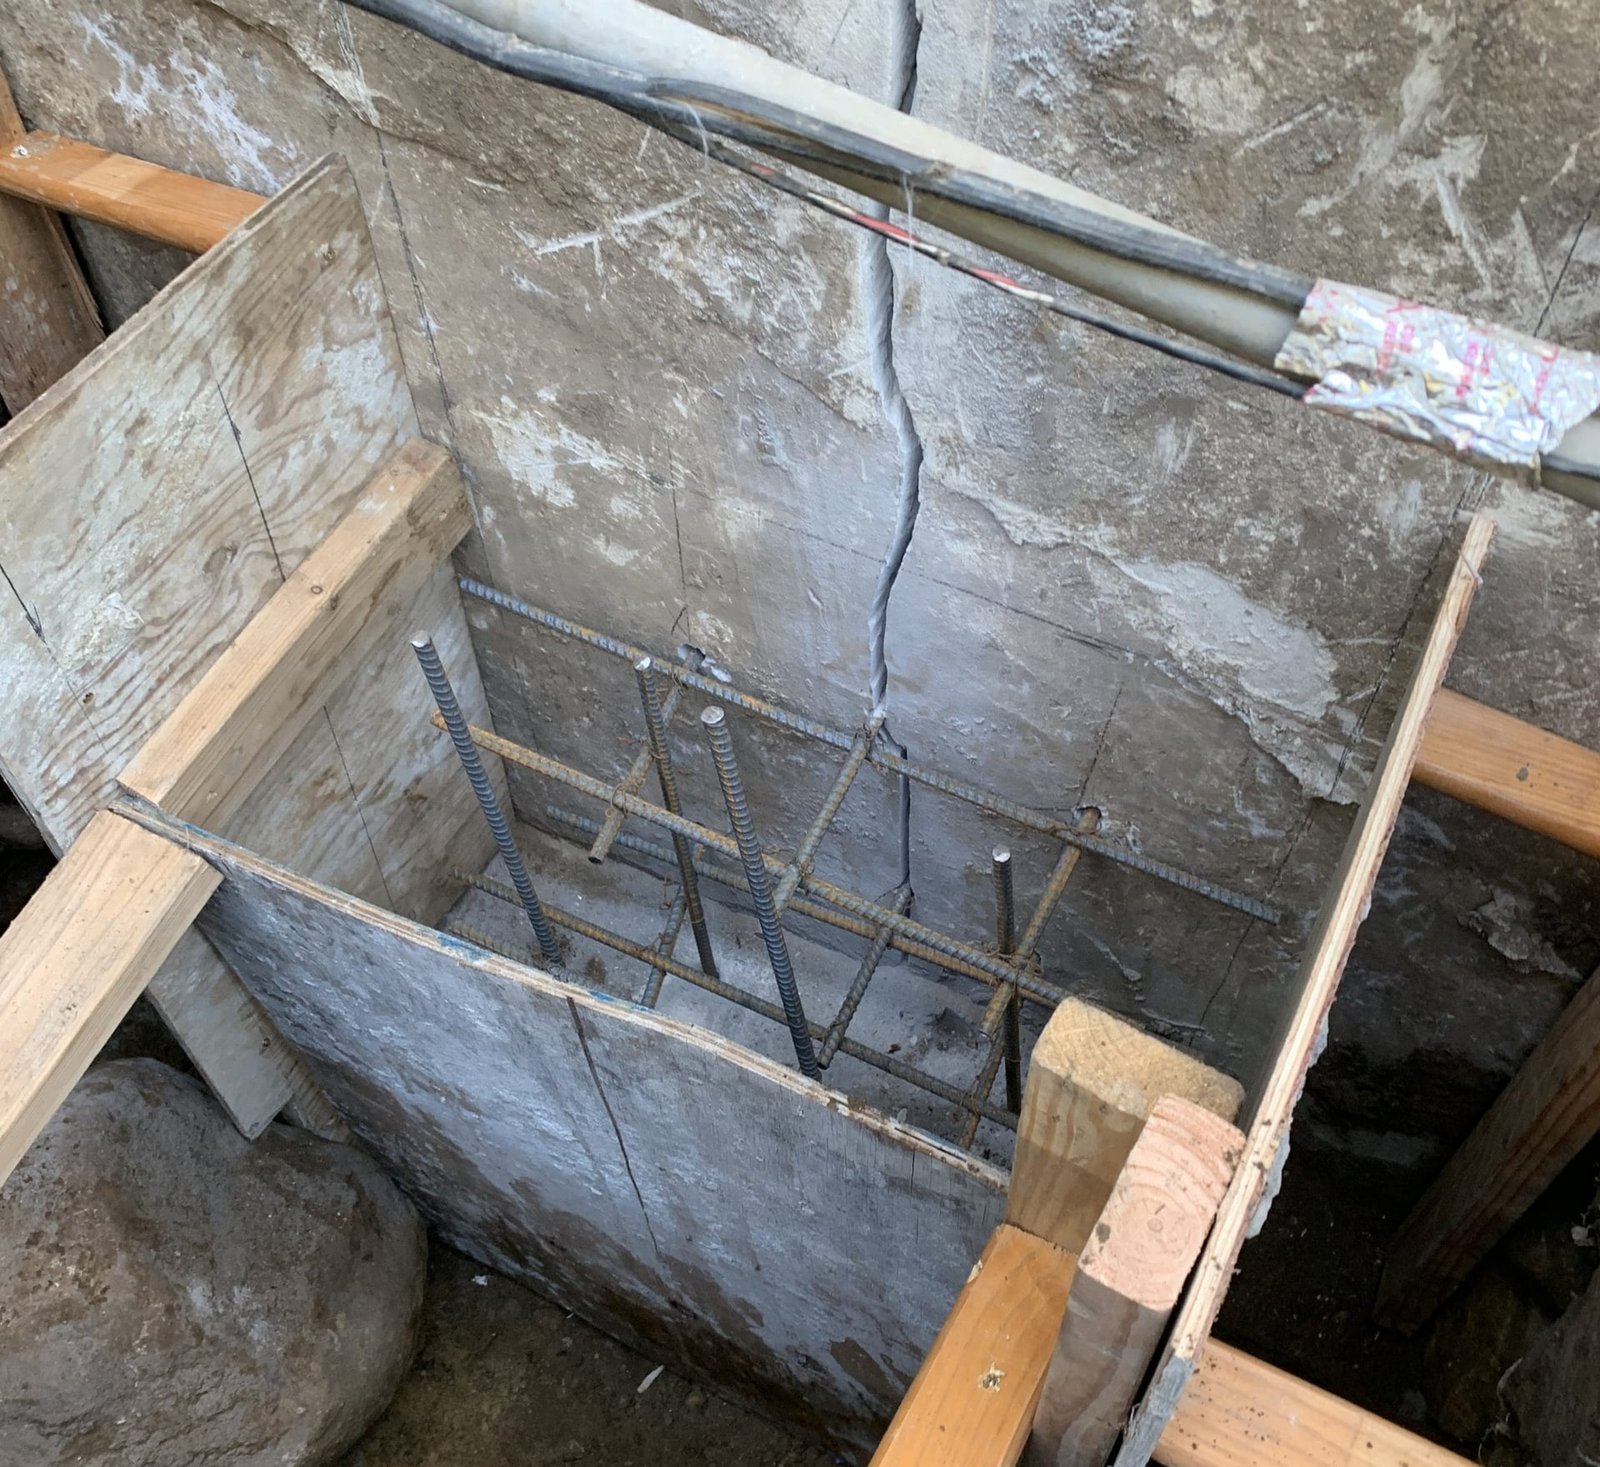
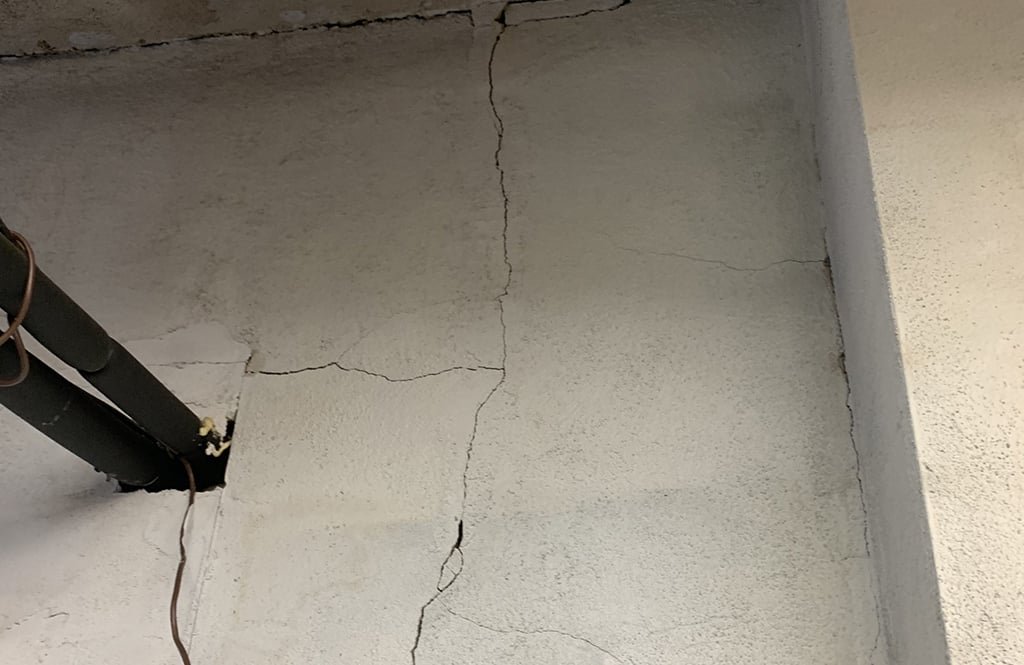
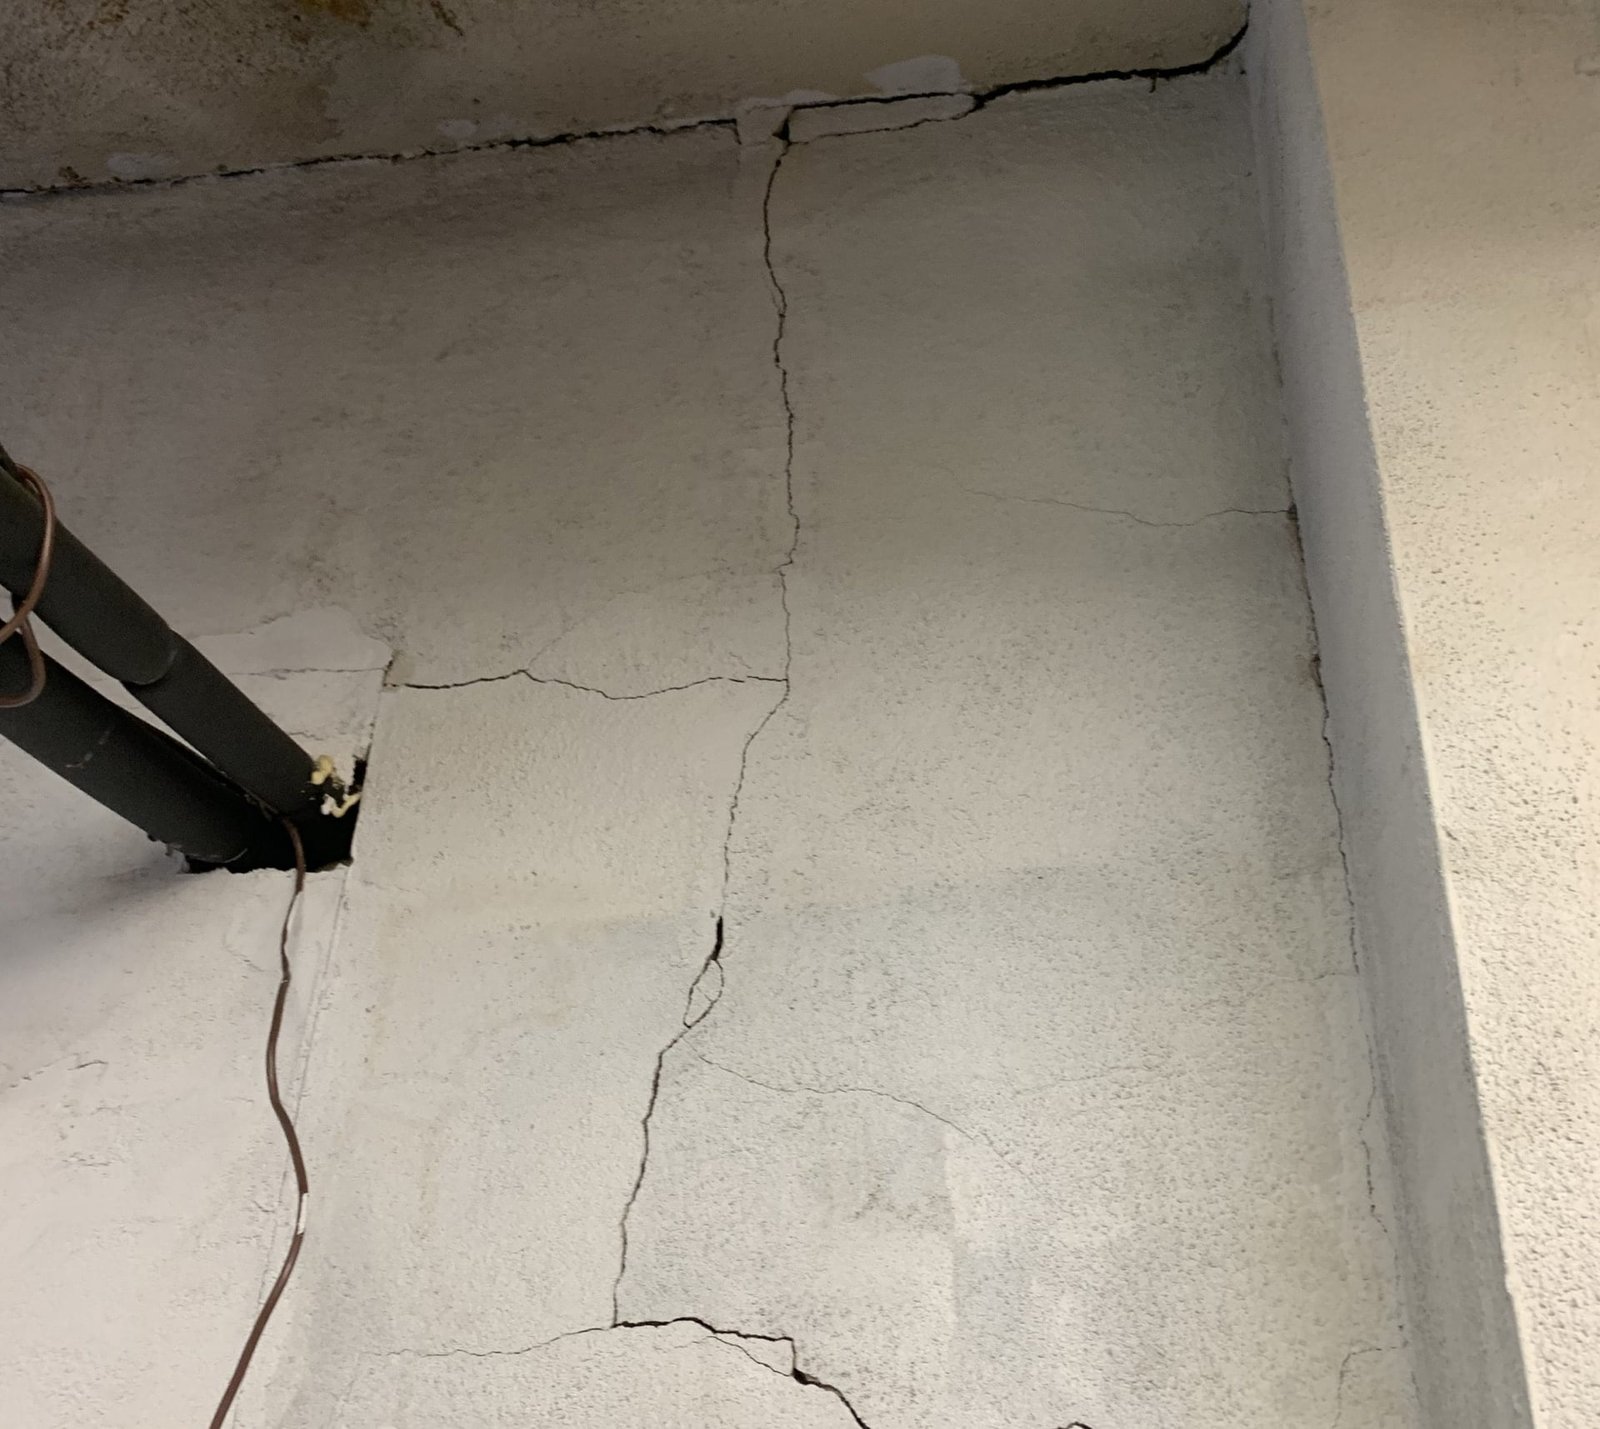
- Horizontal cracks across a basement or foundation wall, especially with any inward lean to the wall
- Cracks wider at one end than the other (settlement signature)
- Cracks that have reappeared after a previous repair, even if you sanded and re-primed carefully
- Cracks accompanied by doors that stick, windows that bind, or floors that have started to slope
- Any crack that is actively widening month over month based on your dated photos
All six patterns point to something behind the wall (foundation movement, framing failure, water intrusion, or a load-bearing element that has shifted). Surface repair on any of these is decorative work, not problem solving. The right scope is structural inspection first, then wall crack repair or foundation crack repair depending on the cause, then the cosmetic finish.
Preparing the wall for paint after the repair
Even a perfectly repaired crack can show through paint if the surface prep is wrong. Three steps separate good touch-up work from professional results. First, prime the repaired area with a stain-blocking primer (Zinsser BIN or Kilz Original). Joint compound is more porous than original drywall paint, and painting over unprimed compound creates a visible flat spot. Second, feather the primer at least 6 inches past the repaired area to blend the texture. Third, paint the entire wall corner to corner, not just the repair patch. Spot repainting almost always leaves a visible halo, even with the exact same paint can.
How to prevent wall cracks from coming back
Most repeat cracks have one of four causes, and three of them are fixable without a structural contractor. Indoor humidity swings (install a humidifier or run an HVAC humidification setting to keep winter humidity above 30 percent). Framing shrinkage in new construction (cracks typically stop appearing after the first two heating seasons as the lumber stabilizes). Water leaks behind the wall (check for moisture upstream of any recurring crack before you repair the crack itself). The fourth cause, foundation or structural movement, needs an inspection.
- Keep indoor humidity between 30 and 50 percent year round to minimize drywall and plaster expansion cycles
- Use setting-type joint compound for repairs, not premixed all-purpose mud
- Re-tape with fiberglass mesh on any repair where the original paper tape lifted
- Photograph and date every crack you find, so you can tell static from active without guessing
- Have any structural-pattern crack inspected before you paint over it, even if it looks small
Raf Volkov
Raf has personally inspected and supervised more than 1,300 foundation repairs across Fairfield County, CT and Westchester County, NY since 2002. He attends World of Concrete and manufacturer trainings every year, currently holds 60+ active industry certifications, and works with a scientific background spanning microbiology, toxicology, and structural engineering — applied to every wall, slab, and footing we touch.
Got a crack that needs a real diagnosis?
We service Fairfield County CT and Westchester County NY. Free on-site inspection, honest root-cause diagnosis, written quote, no obligation.